Sunday 30 December 2012

Sixth Day After Christmas Recycled Craft - Self Portrait

Sixth Day After Christmas Recycled Craft -
 Self Portrait


Supply List:  Cardboard box, paper, glue. scissors, markers, crayons, pencils, etc.. and mirror.

How To Video available on www.facebook.com/artdwellers and http://youtu.be/VjEfxKqcG70
Fifth Day After Christmas Recycled Craft:  Stars and Moon Wallhanging


Supply List:  paper, ribbon, 2 foot long stick, cardboard, glue, and scissors.

Like us on facebook:  www.facebook.com/artdwellers to watch how to video or you can watch the video at:  https://www.youtube.com/watch?v=p7flFSk9PHo


Saturday 29 December 2012

First Day After Christmas Recycled Craft: Mobile

First Day After Christmas Recycled Craft:  Mobile

Supply List:  Toilet paper/paper towel rolls, makers, paper, scissors, and ribbon.

Watch video for this craft at:  www.facebook.com/artdwellers or http://www.youtube.com/watch?v=1k7Xn696m9g&feature=youtu.be

Second Day After Christmas Recycled Craft: 3D Elephant

Second Day After Christmas Recyled Craft:  3D Elephant

Supply List:  Paper, glue. scissors, cereal box, and scotch tape.

Elephant Pattern:

View Video for the project at:  http://www.youtube.com/watch?v=-iPibHsygMg&feature=youtu.be
or at www.facebook.com/artdwellers

Third Day After Christmas Recycled Craft: Lighted Snowman

Third Day After Christmas Recycled Craft:  Lighted Snowman

Supply List:  Clean milk jug, paper, glue, christmas lights, and tissue paper.

Watch the video for this project at www.facebook.com/artdwellers or on youtube http://www.youtube.com/watch?v=QzcsXdtHdTQ&feature=youtu.be

Fourth Day After Christmas Recycled Craft: Flower

Fourth Day After Christmas Recycled Craft:  Flower

Supply List: toilet tissue roll, scissors, paper, stick, glue, and cardboard.

Watch How To Video:  http://youtu.be/EUOJae09srE

'Like' us on facebook:  www.facebook.com/artdwellers

Saturday 29 September 2012

Sunflower Painting Party


Last night was a fun Painting Party.  I am always amazed by how well all of our guests do.  Especially the ones that have no prior art experience.  This just confirms my long held belief that everyone can learn how to draw, paint, etc. just by learning the techniques and rules.  Just like learning how to ride a bike or drive car, there are certain techniques and rules needed to be successful.

Earlier in the week, I spent about 2 hours prepping the canvases.  They required some texture.  I used molding paste and a couple of different stencils to achieve the dots and circles.  All I did was lay the stencil on the canvas, applied the molding paste over the stencil, pulled the stencil off and voila...texture!  If you didn't have stencils you could use your fingers, a palette knife, the end of a pencil, etc. to make texture.

Using molding paste on your walls could be very nice as well.  Imagine stenciling a damask pattern, stripes, checkers, etc.  Painting over the wall with color, then waxing it to make it shine.  Beautiful!

Anyways, the ladies seemed to like the texture on their canvas.  I tend to be a texture person.  I find that it's a great way to add interest to your canvas.  Your painting isn't boring, that is for sure.

We began with the background, which is typical for artist.  Working from the background to the foreground helps to create depth.  I showed students how to go from dark to light using three values of the blue and then blending them.  They started with a dark blue, added a tiny bit of white to some of the paint for a medium blue, and then finally more white for the light value.  Then they tackled the petals, painting the ones behind before the ones on top.  Basically we painted the petal yellow, added some white to show the light source, and some brown at the base.  I showed them how to use their brushes to achieve a point at the tip of the petal, and how to use the flat side of the brush to blend.  Finally, we created a green for the middle of the center (using black and yellow which I just learned about from one of my guests), then a light beige color was painted around that, and then dark brown/black was painted around that.  To blend those three sections we took the brown and beige together on our brushes, and pounced over the whole center so that we could still see the underneath colors slightly.  Then we took some brown and black on our brushes and pounced around the outer edge of the center.  Finally we added a touch of shiny pink to the center which added a little pizzazz.

I believe that the ladies all went home happy with their accomplishment and intend on hanging their masterpieces on their walls at home or give them as a gift to someone special.  This gives me great satisfaction knowing that the paintings are not put in a closet somewhere - never seeing the light of day.

The next Painting Party is scheduled for December.  It's Starry Night.  Can't wait!


Come to me, all who labor and are heavy laden, and I will give you rest. Take my yoke upon you, and learn from me, for I am gentle and lowly in heart, and you will find rest for your souls.

Matthew 11:28-29

Friday 14 September 2012

Week 4, Work with what's working, simplify, and expand.


“I want to stay as close to the edge as I can without going over.  Out on the edge you see all kinds of things you can’t see from the center.” Kurt Vonnegut, Jr.

This was a great week.  A lot more time, thought, and effort went into the painting, and it was satisfying. 

Week four was dedicated to bravery.  When faced with fear you have a choice of running away or facing it dead on.  Facing fear is a chance for growth in real life and in art.  Walk forward into the mystery of the unknown.    When you open yourself to the unknown, you open yourself up to all possibilities.  This, according to the instructor, is where the magic happens.

When faced with uncertainly and frustration, this is an opportunity to try something new.  The artist, at this point, has nothing to lose.   Why not do something wild, unpredictable, and totally out of your comfort zone.  Lean into your vulnerability, be brave and step out of your own way.  As the instructor says, “it’s quite possible that a great breakthrough is waiting patiently for you just beyond your fear”.

Definitely I was at a point where I thought that my piece was a disaster and I was ready to give up.  I was working on the face and couldn’t seem to get it to work out.  After a few hours on the face I finally moved onto something else when frustration overtook me.  This seemed to work as I was able to see it with new eyes when I went to attack it for the second time, and it just seemed to work. 

When beginning to work this week, the instructor suggested spiraling out to see what was working and “work with what is working”.  It could be one specific area of the canvas, color combinations, or using your fingers to paint, or stamping, etc.   For example if you like the stripes that you created on your canvas, make more stripes, if you like blue, use more blue.   You can add in new elements and let go of others.  Expanding upon what is working will help to keep the momentum and help you avoid getting stuck.
If you don’t believe anything is working then it’s time to add new colors, create new outlines, create new marks, simplify areas, etc.

This is the 'before' picture.  As you can see by comparing this picture to the picture up top, I did keep some things, simplified areas, and added new images.


And I was with you in weakness and in fear and much trembling.

1 Corinthians 2:30


Friday 7 September 2012

3rd Week of e-Course


"You have to leave the city of your comfort and go into the wilderness of your intuition.  What you'll discover will be wonderful.  What you'll discover is yourself." - Alan Alda

The third week of the e-course was about paying attention to your environment and realizing what it is that inspires you.  The instructor suggested that you need to go around your home, your neighborhood, etc. and find colors, shapes, words, objects, emotions, etc. that inspire you.  She suggested that as you walk you take a sketchbook and start sketching your inspirational objects and ideas, take pictures and collect objects that inspire you, collect books of objects that inspire you, and take a different route than normal when going places.

When you have a collection of things that inspire you, you can more easily attack the canvas having some possible ideas ready to use.  So with your paintbrush start outlining some of these objects on top of the painting you have been working on thus far.  Be loose in your strokes, relax, and play.  If you do not choose to use objects in your environment, she recommends just making random shapes.


The instructor spoke about spiraling in and out of your painting.  Spiraling in meaning wildly painting in response to your intuition and spiraling out meaning more thoughtful choices.  When you tend to get stuck, it's time to move back and take a look at the whole painting usually leading to a new idea that you can use.

I liked that she talked about the teenager stage.  The stage where you look at your painting and don't like it.  This happens to me all of the time.  I just want to take the piece of art and throw it out.  But I have realized over time, that if you stick to it it always tends to get better.

To better understand what inspires you, and to help you to make a list to help with ideas for your painting, she asked for words to complete these partial statements:

  1. I am inspired by…
  2. I collect…
  3. ________ makes me feel alive.
  4. I love…

The last part of the week, she showed us how to simplify areas, how to accentuate areas, and how to use contrast, and to continue to be loose while working.  This was the most time consuming part of the course so far.


And God saw everything that he had made, and, behold, it was very good. And there was evening and there was morning, the sixth day.

Genesis 1:31


Friday 31 August 2012

Week 2 - PLAY


This was week 2 of my online art course, and it was PLAY week.  As we age we tend not to play anymore or very little.  We get busy with life, get serious, or too busy to play.  Go back to being five and find a swing to swing on, a skipping rope to jump with, go splash water in a lake, go tag your neighbor.  You're it!

 The concept of playing is so important in art and the creative process.  The instructor reminded me not to get so serious about painting and not to worry so much about creating a master piece but concern myself with exploring new ways of painting and listening to my intuition.  Get rid of the should’s and the should not’s in your head.  Don’t worry if it’s not ‘right’.  Don’t try to impress others with your painting.  Your painting doesn’t need to make sense.

Everything that has happened on my canvas so far is supposed to be there.  I love how the instructor says “it is a part of the story that is your painting”. 

There was a lesson on color.  Something I didn’t really need to learn as I have taught art for seven years, and have personally taught this lesson.  But the idea was to try combinations of colors as you create the canvas.  To avoid mud, it’s important to keep your cools and warms separate. 

This week it was important to play, to build on the variation of marks, to become more comfortable in how to use the tools to paint on the canvas, and finally to incorporate all colors in the same layer avoiding mud.


On the fourth day it was important that I play with value.  Value is the lightness or darkness of a hue.  Value goes from light to dark and everything in between.  So we used black and white and played, sometimes moving the black flush with the white to see what would happen.  It was obvious that the light was coming forward and the dark was receding.  It was also amazing as to how much the canvas came alive with the sharp contrast of white and black.


The final day we took color, added some water and/or glaze to it, and with our fingers, glazed over the top of random areas of our canvas.  This I loved, and I found a new color which I love.  It’s a gold and when I put it on my canvas my canvas was smiling.   It was very cool.  I also liked to put one glaze over another.  The combination of the two glazes and the marks underneath was quite spectacular. 

I felt like playing some more so with my fingers I started making more marks of lines and swirls, and dots.  I really did feel like I was playing and yes it was freeing.


There are still three more weeks to go in this course and I am sure that my canvases will look a whole lot different when I am done.  I can hardly wait to see what I create!


Anxiety in a man’s heart weighs him down, but a good work makes him glad.

Proverbs 12:25


Saturday 25 August 2012

Painting Party at Art Dwellers


We had our second Painting Party last night.  It was a blast.

In preparation for this event, I marked the middle of each canvas so that my guests would know where to start making their stripes, then I cut out enough fleur de lis from paint-able wallpaper for everyone.

To begin with, I had everyone choose two acrylic paint colors that would go in their homes and use the lighter of the two to completely cover their canvas.  While that was drying, I asked that everyone paint the same light color on their fleur de lis.  

While the fleur de lis was drying they needed to start the stripes.  Each started with 1.5 inch painters tape down the center of the canvas using the marks I gave them for a guide.  After the first strip was put on, they lined up the next strip right along side of the first.  Then they lined up another strip beside the second making sure that the tape didn't overlap.  Then they pulled the second strip off.  They used the second strip they had just pulled off and placed it flush with the third strip and then placed another strip beside that one.  Again, the middle of the three strips was removed.  This continued on until there was no place left to make stripes.

A darker, deeper color was used to paint the second stripe color, and then immediately they pulled all of the tape off their canvas.  Now they had a striped canvas of their light and dark colors.  They went back to the fleur de lis and lightly brushed the top of the raised paper with the darker color they had chosen earlier.  Some even put a third color on. 

We went ahead and glued the fleur de lis to the striped canvas with mod podge and/or my favorite fabric glitter glue.  Then they dry brushed some colors over their stripes.  Once that was complete they outlined the outside of the fleur de lis with a dark color.  

Finally they glued, with E6000, the metal strips I had prepared for them. 

Everyone was so pleased with their piece, and some art has already been placed on my guests walls:) 

 I just need to say.  The art was good, but just hanging out with these women was the best!


Tuesday 21 August 2012

Enlightened


This is the first of five weeks of the online class I wanted to share with you.  Please try these ideas in your journal pages if you are keeping up with your journal, or use them in creating a piece of art.  This week was a lot of fun.  I did some yoga, something I haven’t done in years.  It was basically 5 minutes of stretches, breathing, and shaking it out.  All it took was 5 minutes for me to feel relaxed.  I am going to write that down for future use!  Anyways, the purpose obviously is to relax enough to approach the painting without care.  It worked!

Now feeling relaxed I put on some music that I loved, dabbed my canvas with warm colored acrylic paints and with a foam brush, rag, and spray bottle started moving the paint around the canvas.  The intent was to fill the white of the canvas with color and to just let my intuition tell me what was next.  There was no need to worry about what it looked like, I won’t see much of it in the final layer.  What I found was that I needed to remind myself that I don’t need to make anything in particular, just do want feels right.  It was fun to see how the paint dripped and moved after I sprayed the canvas with water.


In the second canvas, the instructor suggested that I blindfold myself.  So blindfolded with a palette full of warm colors, I started swaying to the music and marking up the canvas with long, short, broken, etc. marks.  It was even more freeing than the exercise on the first canvas.  I couldn’t see where to go, I just opened my senses to the sound of the music, the feel of the canvas and paint, and the movement of my body.  As you can see, the result was quite different.

  
The instructor had some insights worth sharing.  She said, “what you choose to believe about yourself and about life often becomes what is true”.  If you change your thoughts you change your life.  She suggested that you could change your life story just by what you think.

She suggested asking these questions of yourself:  “how do you perceive yourself as an artist”, “what is your relationship to your intuition”, “what is the most challenging thing about making art for you”, and “how do you perceive yourself as part of a creative community”.  If your answers to any of these hold negative remarks transform your answers into positive ones.  She suggested that you write your affirmations down and say things like:  “I embrace the creative process with patience and trust”, instead of,  “I will embrace the creative process with patience and trust” .  Catch yourself and begin to reprogram how you talk to yourself and the world around you. 

On another day, cool colors were used in the second layer.  It is really important to wait until the first layer is dry before starting the second layer.  If the first layer is wet, the colors on your canvas will turn to mud.  After doing some more yoga, and going about painting without expectations, I used a foam brush, a bristle brush, my fingers, a rag, etchers, random objects for stamping, and a spray bottle.   She gave two pages of ideas on possible ways to use these tools, but in the end it is up to you what you want to do.


This has certainly been a new experience for me and I certainly would not have gone about making art this way in the past.  I can hardly wait to see what is on the agenda for next week.  I’ll keep you posted…


And your ancient ruins shall be rebuilt; you shall raise up the foundations of many generations; you shall be called the repairer of the breach, the restorer of streets to dwell in.
Isaiah 58:12

To put off your old self, which belongs to your former manner of life and is corrupt through deceitful desires, and to be renewed in the spirit of your minds, and to put on the new self, created after the likeness of God in true righteousness and holiness.
Ephesians 4:22-24


Friday 17 August 2012

Third Layer - Louise Nevelson


Louise Nevelson, 1899-1988, is a favorite artist of mine.  She created abstract wooden environments, or sculptures, out of found objects.  Her work is especially appealing to me as I love working with wood and I love architectural pieces.   What I also love is the texture and her ability to show depth through layering and shadows.  I have long wanted to do a gigantic piece to hang on my wall.  I have started collecting objects and intend to get to as soon as I can. 


She is my inspiration this week.  First, I searched around the house for objects that I could use in this project because I wanted to make sure that my sectioned off page would fit my objects.  Sectioning off of the page was done by hot gluing popsicle sticks directly to it.  You can use whatever you want or whatever you have available, even simply, strips of paper.


I started hot gluing objects to the top of the page and worked downwards.  Once I had the objects laid I boxed them in with the popsicle sticks.  Be mindful of balance, and variety.  You want your page to look interesting.  It doesn’t matter about color obviously as, in Nevelson style, you will paint over the whole piece with one color.  Her colors used were white, black, and gold.  As this is a journal page, white works nicely as a background for words and thoughts.


I took my page outside and spray painted it white, you can also just use a paint brush and paint it.


When the paint is dry, use a sharpie and start writing.  Very cool.

PROMPT:

Being envious of someone is a lousy feeling.  Why is it that we want what others have.  The new clothes, the new car, the house, spouse, etc. etc.  I  believe it's because we have been conditioned to believe that these things will make us happy.

Millions of dollars a year are spent on advertising what you 'need' to have to be happy.  I've got to tell you, many of my happy times were when I had barely any possessions at all.  While being a student, and single mom, I lived in a basement apartment that had leaks in the ceiling, the power would go off every time I plugged in two things at the same time, and I dealt with bugs and bats.  Despite my living conditions, what made my life wonderful were the friends that I had, and the son I loved and still love so much.

Going back even further, I grew up in a family of eight children.  I had to share my room until I was late into my teens, I received hand me down clothes, presents consisted of one or two items, and certainly doing any activity that cost anything was out of the question.  At no time did I think my life stunk because I didn't have the material things others had.  What made my live great then was that I had wonderful friends that I was able to hang out with and share my life with.

Having oodles of money and possessions does not guarantee happiness, that is for sure.  Simply look to Hollywood lives of the rich and famous.  There is a lot of unhappiness evidenced there.  This condition is not exclusive to Hollywood as I am sure you are aware.  No, happiness, I believe comes from having people around you that care about you, and that you believe that you matter in this world.

Let me encourage you to take a look around and appreciate the non-material things that are important.  Your friends, family, and relationships.  Less time at the mall, more time visiting and sharing with people who matter.

***********


But those who desire to be rich fall into temptation, into a snare, into many senseless and harmful desires that plunge people into ruin and destruction.

1 Timothy 6:9


Sunday 12 August 2012

Third Layer - Contact Paper


Here is a simple tool to use in your artwork.  Contact paper is available at Target, Walmart, some Grocery Stores, etc.  What’s nice about contact paper as a stencil is that you can stick it onto your art piece and paint right over the top of it with no concern about the stencil shifting.
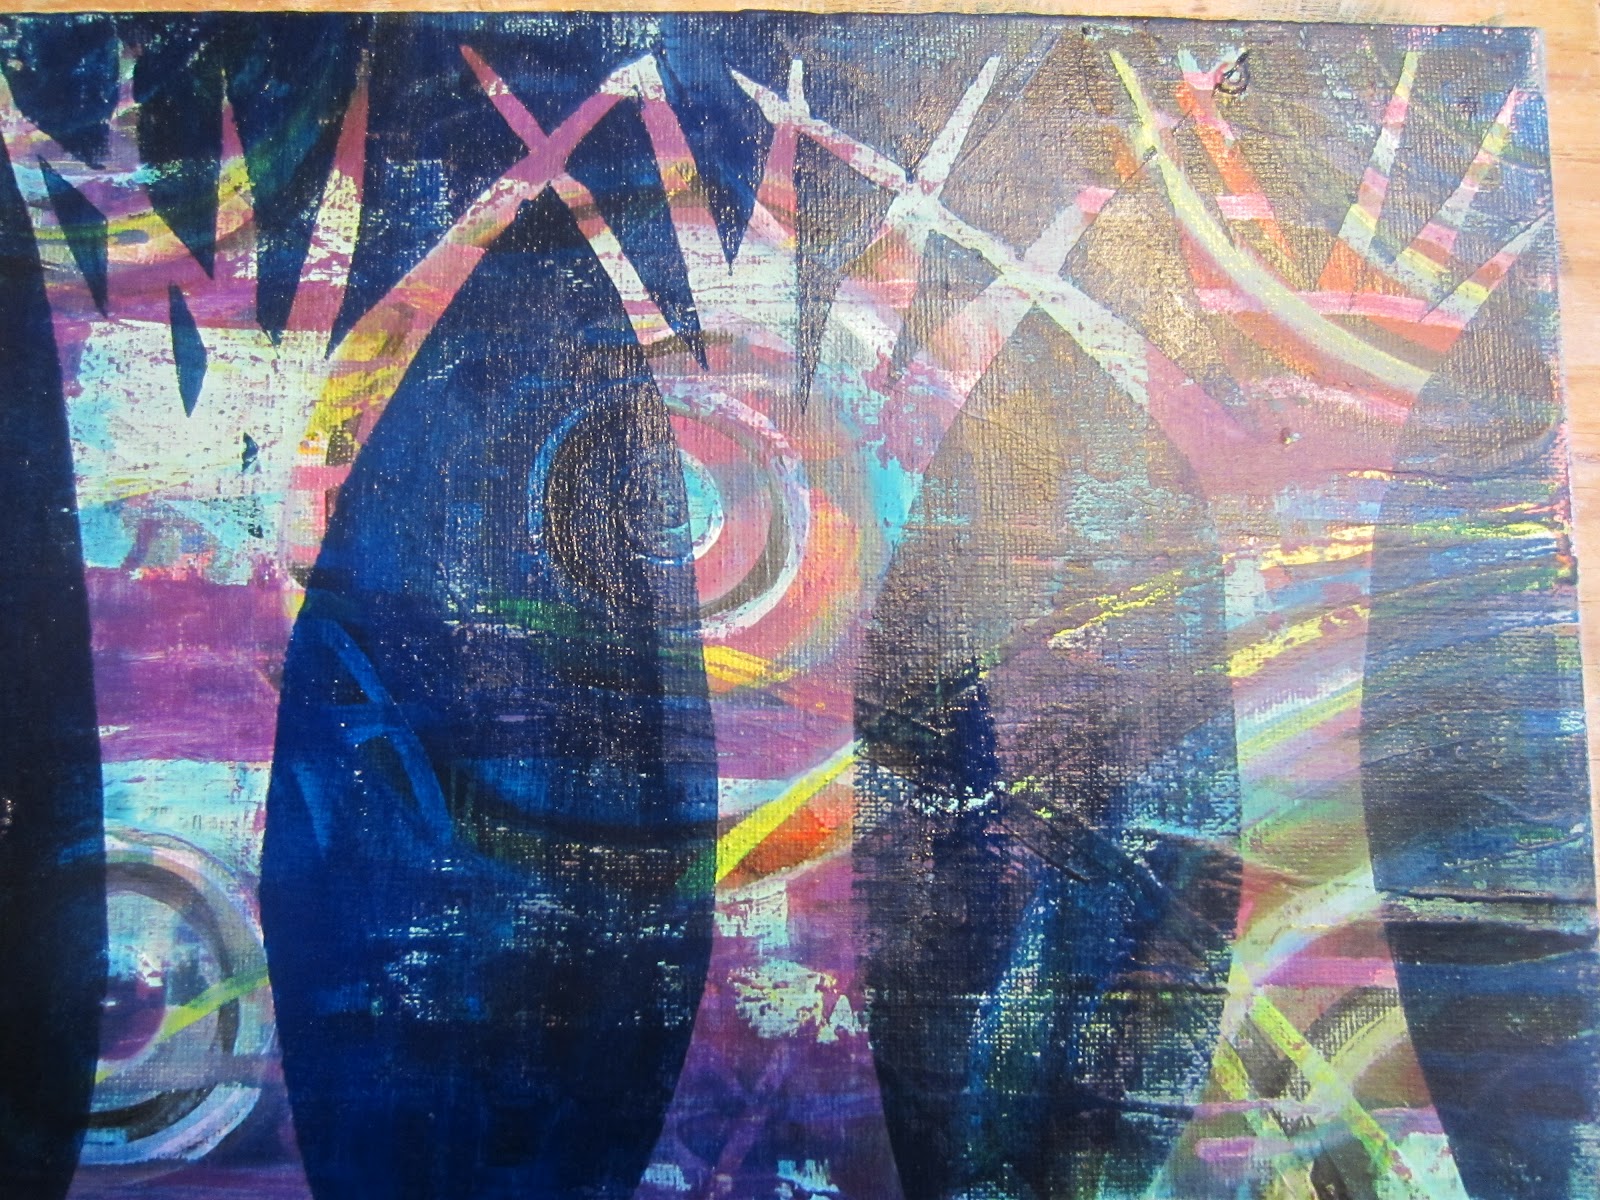
 
You may remember this background from a previous blog.


I still wanted to see some of the background so using contact paper was a good option.  I started by drawing a tree scene on the contact paper and then cutting it out.  I peeled the white paper off of the clear plastic then stuck the plastic onto the artwork.


With a little bit of blue and black paint I applied a light coat over everything, including the plastic.  Then I peeled the plastic off.


To achieve the leaves I cut a few out of the white of the contact paper with a box cutter.  I then used a muted green and stenciled the leaves around the trees giving the illusion that there were leaves behind the trees.  When the leaves were dry I stenciled some brighter ones on top of the trees.


I needed some moons, so I cut out a circle within a circle.  I put the large circle down then put the center circle back into the center of the large one.  Then I stenciled it a few times on the art piece.   I then took the center circle and painted around the edges.  This resulted in the area where the circle was placed untouched and just the area around it painted.


I wanted stars so I punched some holes in a piece of paper and stenciled the stars onto the background of the piece.  Then cut out a bird and stenciled it a few times.


I stenciled some letters onto the piece which certainly changed the look.


Another thing you can do with contact paper is 'photo transfer'. Basically you take a photocopied image, place it on the clear contact paper, burnish the image on the contact paper making sure that you don't have any air bubbles, place it into water, wait for about 20 minutes, then remove the white paper.  You can use a credit card, on end of a knife, the end of scissors, or whatever to burnish the photo onto the contact paper.  This method is good when you want to put on image over top of another image that you still want to see.  For example, you can put words over a painted flower.  Note, the photocopy should be best quality.


I placed the transferred image onto my artwork but I was unable to see it very well due to the darkness of my artwork.  I went ahead and cut out a lighter tree to put the image onto.  Cool.


PROMPT

Peace.  Oh yes peace.  There are people who are constantly going, talking, partying, and on and on.  They never seem to have a minute of peace. 

I was one of those people who felt like I needed to ‘do’ all of the time.  Always going places, entertaining people, making things, etc. etc.  I still have a high energy level but I have finally recognized my limit.

I am a people pleaser and feel drawn to do for people even though I am tired.  In the past, I never seemed to get enough rest.  Then one day I said ‘no’.  That’s a foreign word of mine.  I don’t want to let people down or disappoint.  I find much joy in giving.

You know what, the sky didn’t fall that day I said ‘no’.  Nothing exploded.  The world didn’t disappear.  The truth is, I was able to refresh, rejuvenate, and start again with more energy and a happier heart.  All I need is one day.  It just takes one day for me to re-energize.  No noise, no people, no internet, nothing.  It’s amazing what a difference it has made for me.

Now, when people ask me what I want for a gift, I tell them one night, by myself, in a nice hotel. There is nothing quite like it.

How can we be effective if we don’t take time to re-evaluate, think, and contemplate?  I believe that we sell ourselves short when we don’t take time to just be quiet.

What is your limit? Take the time to rejuvenate and refresh.   You are so worth it.

Believe it or not.  We really do care about you.


 Come away by yourselves to a desolate place and rest a while.  For many were coming and going, and they had no leisure even to eat.


Mark 6:31